HighFleet – Shipworks Editor Guide
While playing HighFleet, you will undoubtedly use the Shipworks to repair your ship and purchase new parts. Still, in the midst of a campaign, you may not want to run the risk of making major modifications that may prove counterproductive when in an actual combat situation. The Shipworks Editor, accessible from the game’s Main Menu, is a creative space that replicates where your imagination can run wild without repercussions. The Shipworks Editor is a standalone module that serves multiple purposes:
× Freely experiment with different ship designs, load-outs, and configurations, with no cost restrictions.
× Immediately test your creations and modifications in a real combat situation, with no penalty from destruction.
× Save your custom ships so that they can be used in the main HighFleet game.
EDITOR OVERVIEW
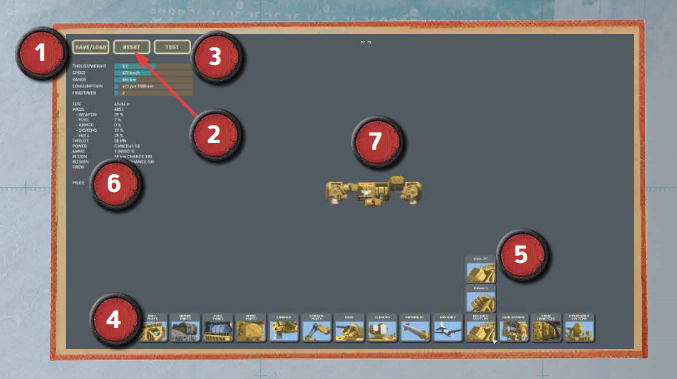
The Shipworks Editor has a similar interface to the in-game Shipworks and works in much the same way.
1. Save/Load – Click to open the Save/Load menu.
2. Reset – Click to clear your work in progress and return to a blank slate.
3. Test- Click to enter a live test arena with your work in progress.
4. Parts Category – Click to expand a list of parts in that category.
5. Parts – Click to select a part, drag it to the workspace and click to place it.
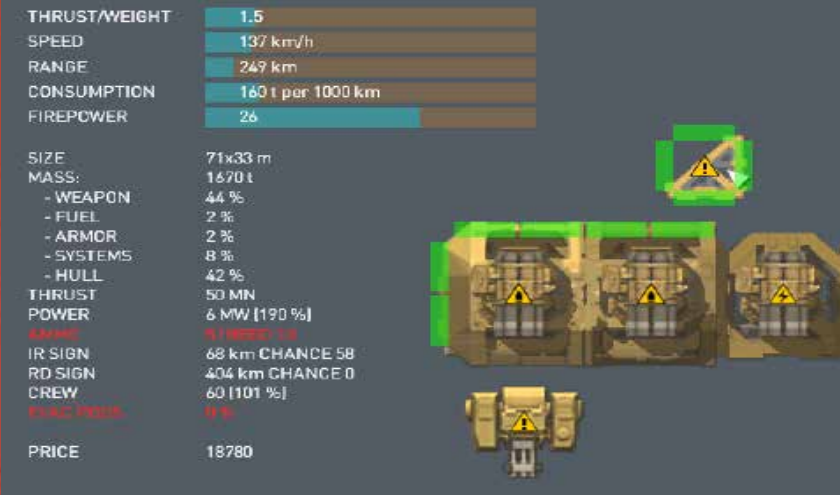
6. Status Readout – Crucial dynamic statistics for your aircraft.
7. Workspace – Your current creation. The Bridge will be present at the start and cannot be removed.
EDITOR CONTROLS
× Escape Key – Quit to Main Menu.
× Left Mouse Button – Select a part or place/attach a selected part.
× Right Mouse Button – Delete the selected part, or if nothing is currently selected, this will select a group of attached parts – be careful not to right-click again, or you will delete the parts!
× Mousewheel – If a part is selected, this rotates the part. If nothing is selected, it zooms your workspace in/out.
STATUS READOUT
Hull Parts
Step one should always be to fill out the underlying Hull frame of your craft. You can’t connect weapons, power units, thrusters, etc., to your ship unless you have empty Hull slots with attach points. Hull parts come in a variety of sizes – you may need larger hull segments to attach larger parts.
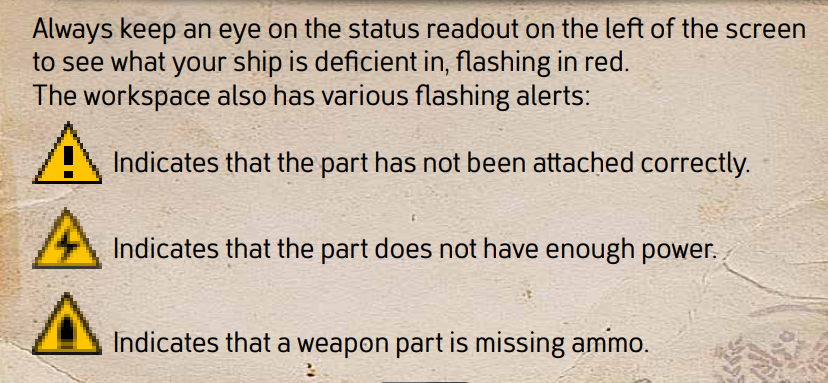
Click on the Hull category and choose a hull part, move it over to the starting bridge part and nudge it until it “snaps” into one of the green attach points. Click to attach it. If you miss the attached point, an exclamation mark will flash – click to select the hull part and try again.
Armor
These are similar to Hull parts, but they cannot be used to attach other parts – they are only for protection. Add Armor at the end of building your craft once the main parts are set. Use it on the outer edge or to protect sensitive parts. It offers decent protection against direct fire; however, it comes at the cost of substantial added weight.
Chassis
To land in a town, you need a chassis to support the ship. Attach at least two Chassis parts to the side or underside of the craft to act as landing struts. Placing at the side ensures their legs reach far enough below the ship’s superstructure to account for some flex when landing.
Weapons
Unless you’re making a pure Utility ship, you’re going to want some offensive capability. Weapons are the most resource-intensive parts as they need not only sufficient power supply but also ammo stores and crew to man them – so you need to think carefully about your armaments.
Ammo
Weapons, of course, require ammunition to be useful, so the system will alert you when your ship doesn’t have sufficient ammo storage to match its armaments. Similar to adding power supply units, you need to add these ammo stores. Check the status readout to see how many ammo units are required and how many you currently have.
Power Generators
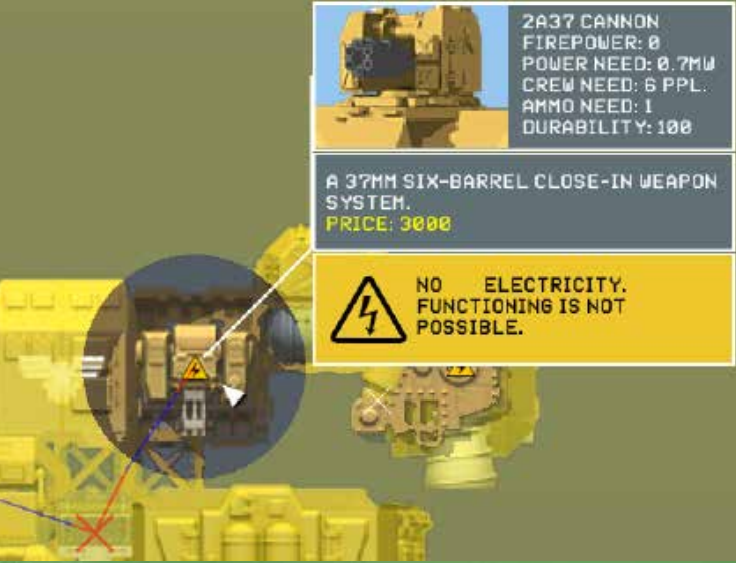
As you start adding parts to your ship, you may notice a high voltage sign flashing on them. This is because you don’t have enough power to run those parts – in fact, when you first start building, you have no power supply whatsoever.
There are two different sizes of Generators, and depending on what you have installed on your ship, you may need multiple units to supply your ship fully. Make sure you leave enough space for power or add more generators incrementally while you build to ensure your design won’t be caught short. Check the status readout to see how many megawatts of power is required and how many you currently have.
Highlighting a part that requires power will show power tracing through the ship to the relevant generator. These connections are automatic, and you don’t need to concern yourself with routing.
Crew Quarters
Many parts, from your generators to radars, require the crew to operate and maintain them. Your ship always has a bridge with minimal crew, but you may need to add auxiliary crew quarters to build out your rig. The crew status will flash red if you have an insufficient crew to man your weapons and utility parts.
Thrusters
At some point, your aircraft needs to fly. A veritable gunship loaded down with weaponry will require substantial thrust to even get off the ground, while a speedy recon vessel will have a very different profile. Your thruster capability needs to be sufficient for the weight of your ship. In other words, ensure you have a suitable thrust/weight ratio for the type of maneuverability you desire for that craft. The position of thrusters is also critical, as this impacts your flight dynamics and especially your turning profile. Keep your craft’s center of gravity in mind for stable flight. Experimenting with iterations in the test arena is the only way to ensure you get the balance right.
Fuel Storage
Attach enough Fuel Storage parts to drive the Thrusters – the status readout on the right will tell you your range with the fuel available. Keep an eye on this as you add more parts to the ship, which increases your weight and hence reduces your fuel efficiency.
Utility
Beyond the essentials, you can also kit out your ship with various utility parts to specialize its role in your fleet. Examples include a Fire Suppression System, an Aircraft Deck, Automated Defences, ELINT Sensors, or Tactical Arms.
Tips & Testing
Position of parts matters! Not only does it determine protection from armored shielding, but other superstructures can obstruct some special parts. Try to install items that can be blocked, such as Radar, ELINT Antennas, Jammers, and IRST, at the highest point of the ship.
× Armor at the bottom of your ship can allow you to fly over the heads of enemies and be protected. It also helps against ground forces taking potshots at you.
× Your ship’s overall weight and power usage will impact your fuel efficiency. This won’t be obvious in the Shipworks Editor testing, but it will hugely impact the main campaign.
× Remember to install a Fire Suppression System – these can be crucial in combat to prevent fires from wiping you out rapidly.
× Keep an eye on the calculated Cost of your ship – there’s no point building out a monster if you can’t afford to commission it into your fleet!
Click the Test button to open a live skirmish arena where you can try out your new creation in a real battle. This includes all regular combat features, with you up against a series of enemies. Hit escape at any point to back out to the editor.
Controls are the same as in normal combat. Hit escape to end testing; otherwise, you’ll be given a choice to return to the editor when you defeat all enemies or are destroyed.

